
A relay is an electrically operated switch. A set of functioning contact terminals and a set of input terminals for one or more control signals make up the device. Any number of contacts, including make-contacts, break- contacts, and combinations of both, may be present on the switch.
Relays manage several electrical components in your car. They act as switches, allowing one circuit to control another despite amperage differences. Knowing where the issue is when they break down is crucial for a secure repair that doesn’t harm the car.
Relays are electronic parts that exchange high voltages or currents with a lower voltage or current. Electrical signals control the relay’s function as a switch. The relay opens or closes a circuit in response to signals, allowing or preventing current flow.
Fortunately, testing a relay is a job that even inexperienced mechanics can complete. In this reading, we’ll explore how to test a relay and provide safety tips for working on one.
Let’s begin!
Related: What are Relays, Their Functions, Types & Working?
How Do You Test a Relay?
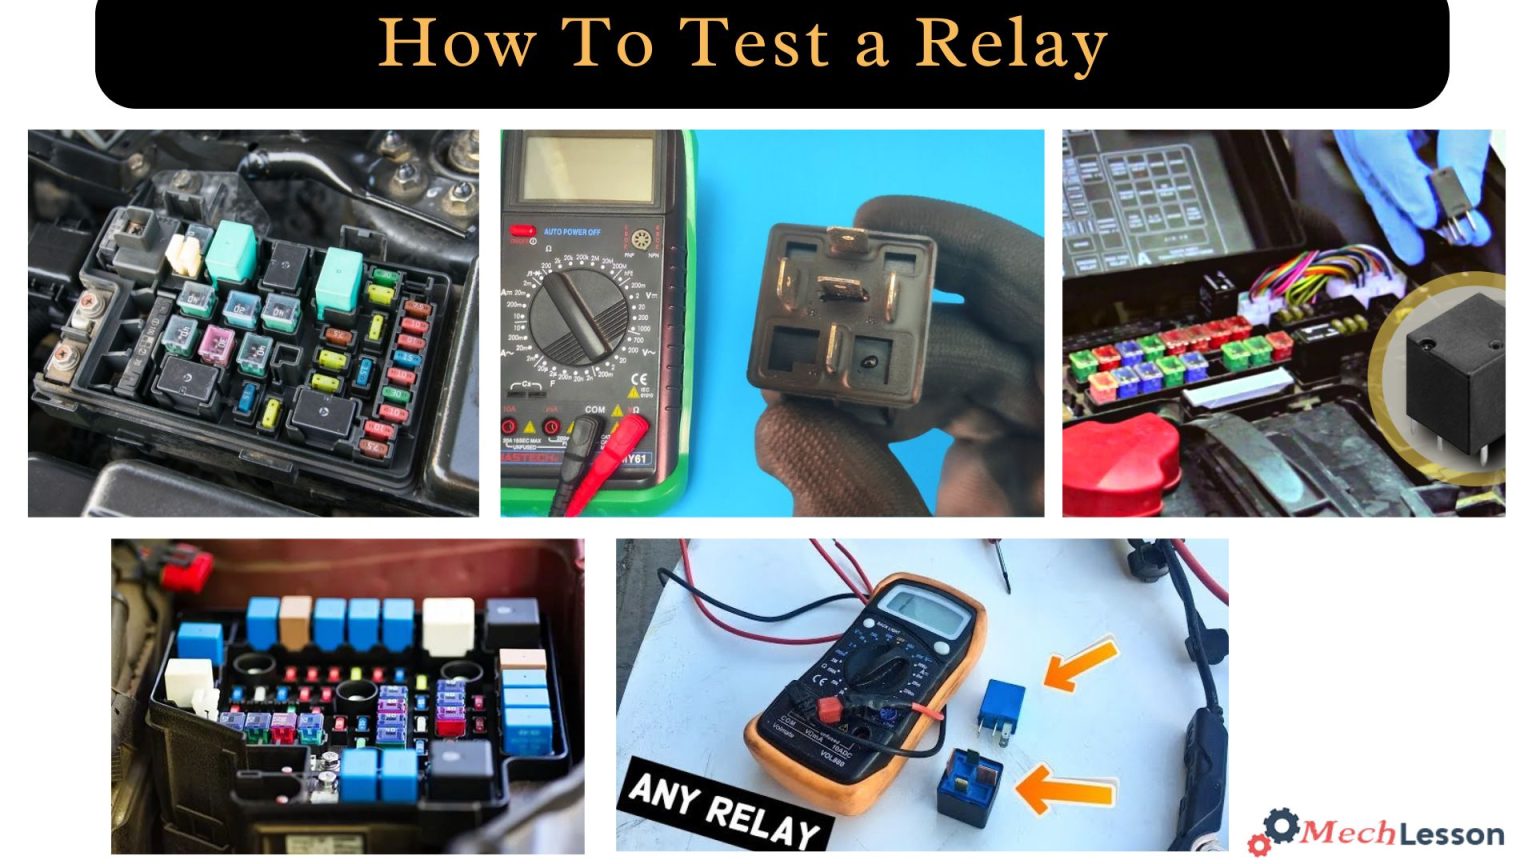
There is no need for a whole kit to check the relays in your car because it is a straightforward procedure.
You’ll need these items to check for defective relays: a high-impedance test light, jumper wires, Ohmmeter (commonly known as a digital multimeter or DMM), a replacement relay, and a vehicle service manual (not really necessary but highly recommended).
Here are steps to guide you on how to test a relay:
Find the relay that needs testing. Depending on what it controls, it can be under the dash or in the engine compartment. Please refer to the electrical chapter and wiring diagram in your service manual if you need clarification on the location.
Replace the relay with a known-good replacement to test it quickly and easily. The second relay can catch fire due to the same issue that destroyed the first. Additionally, it can be costly to replace. While disconnecting the relay, inspect and clean the connectors.
Set an ohmmeter to Ohms. Measure resistance by touching the leads across the electromagnet coil pins. Between 50 and 120 ohms is OK. It’s time for a replacement relay if it’s out of range or open, which may be caused by a faulty electromagnet coil winding.
Keep the multimeter set to continuity or ohms. Cross the switch pins with the leads. Relays that are normally open should display open or OL.
Across the pins, connect a 9–12 V battery to power the electromagnet coil. As the electromagnetic coil energises the switch and closes it, there should be an audible “click” from the relay. On this 4-pin relay, polarity is unimportant, but on diode relays, it is crucial.
Jump the battery positive to one switch terminal while the coil is still active. Connect a test light between the ground and the other switch terminal. The current should flow to the test light, causing it to shine. Remove the battery-positive jumper. The test light ought to turn on.
Check the voltage of the relay at the switch. A voltage drop may result from poor contact points. Remove the test light, turn the multimeter to DC volts, and then touch the leads across the test light connectors or switch pins as indicated.
The voltage of the battery should match the reading.
To ensure proper resistance, test the switch. The positive jumper wire should be disconnected. Energise the electromagnetic coil. Measure the resistance between the switch pins using the multimeter set to ohms.
A usually closed relay should measure open, or OL, while an energised, normally open relay should measure close to zero ohms.
What are some Safety Tips when working with relays?
Although relay testing is an effortless process, safety should always come first. When working with relays, it’s a good idea to consider the following:
- Never begin working with relays or anything electrical in an area that has fuels or other flammable or explosive gases present.
- Mixing and matching relays from various parts of the car or a random garbage bin in your garage is not acceptable if you’ve decided that the relay is broken and has to be replaced. A power surge or short due to the incorrect relay can harm the electrical wiring of your car.
- Even if you’re an experienced garage tinker, use the service manual—not the owner’s manual—to identify and comprehend the wiring system and relays in your car.
- Avoid dropping the relay by handling it carefully. If the relay has an internal problem, the wiring may burn or melt. Do not alter the relay in any way, either.
Related: What is Fuel Pump Relay? Its Functions and Bad Symptoms
FAQs
What causes relay failure?
Leaky contacts, cracked contacts, or significant size and position displacement are the main negatives. Such conditions will have an impact on the relay’s contact dependability. Typically, overheating, wear, and welding are the problems with contact parts.
Can a bad relay drain a battery?
The ignition relay is essentially a switch for the power to the ignition system’s electrical components. Making sure electricity gets from the battery to the various components that require power is its responsibility. A defective relay will drain your battery and make it challenging to turn the ignition.
Can you test a main relay?
It’s rather easy to determine if your main relay is impacted. Just start the car and see if it keeps running. If so, the primary relay is working properly. An engine cutout can affect the primary relay.
What type of tests are done on relays?
The voltage and current transformers are being tested. The settings for the relay alarm and trip are being checked. both initial and follow-up injection testing.
How do relays work?
An electromagnet drives an electrical switch known as a relay. A little current passing through the relay’s wire coil produces a magnetic field that attracts a metal switch, or contact, to the area of the coil. By closing the circuit, this contact permits a greater current to flow through it.
Is a relay harmful if it clicks?
No, not always. The electromagnetic coil inside a relay is what activates and deactivates to cause the switch to open and close; hence, a clicking sound from the relay might be typical. The relay may need to be changed if the clicking sound is abnormal, such as if it is louder than usual or if it is accompanied by additional symptoms like a failure to start or intermittent operation.
How do you test an overload relay?
To test an overload relay, you will need a multimeter. Here are the steps to follow:
- Disconnect the power supply to the motor and remove the wires from the overload relay.
- Set your multimeter to the continuity mode, which will allow you to test for a complete circuit.
- Touch one overload relay terminal with one multimeter probe and another terminal with the other. There should be no continuity between these two terminals.
- Now, connect one probe to the first terminal and the other to the terminal where you connected the motor wire. There should be continuity between these two terminals.
- To connect the motor wire to the other terminal, repeat these steps.
- If step 3 yields a continuity reading, the overload relay is defective and requires replacement.
Note that this is a basic test and may not detect all faults with an overload relay. If you suspect that there is an issue with the relay, it’s best to consult a professional electrician or technician for a more comprehensive test.
Does a relay need battery?
A relay does not require a battery to function. A relay is an electromechanical device that controls the flow of current in an electrical circuit by operating a switch with the help of an electromagnetic coil.
A tiny current, typically from a control circuit, powers the coil, eliminating the need for a battery. However, certain relays could come equipped with LED indicators or other features that need a tiny battery or other power supply to function.
Related: What is An Ignition Relay? Its Functions And Replacement Cost
Can you test a relay with a 9v battery?
Yes, you can test a relay with a 9V battery. Here are the steps to follow:
- Disconnect the relay from the circuit it’s in, and remove any wires connected to it.
- Take a 9V battery and connect a wire to the positive terminal of the battery.
- Touch the other end of the wire to the input pin of the relay (the pin that activates the electromagnet).
- Take another wire and connect it to the negative terminal of the battery.
- Touch the wire’s other end to the relay’s ground pin (the pin connected to the relay’s metal frame).
- You should hear a clicking sound, and the switch inside the relay should move from one position to another.
- If the switch doesn’t move or you don’t hear a clicking sound, the relay may be defective and requires replacement.
Note that this is a basic test and may not detect all faults with a relay. If you suspect that there is an issue with the relay, it’s best to consult a professional electrician or technician for a more comprehensive test.
What makes a relay activate?
When a small current flows through a relay’s wire coil, it generates a magnetic field that attracts a metal switch—or contact— to it, activating the relay. A control circuit, such as a switch, a sensor, or a microcontroller, can regulate the relay’s activation.
A tiny current passes through the coil of the relay when the control circuit delivers a signal to it, activating it and allowing a greater current to flow through the switch.
This larger current can control a variety of electrical appliances, such as heaters, lights, and motors.
What causes a relay to activate?
An electrical signal that energises the coil of wire inside the relay activates the relay. This electrical signal may originate from a switch, a sensor, or a microcontroller, among other things.
An electrically charged wire coil produces a magnetic field that attracts a metal switch or contacts to it. By closing the circuit, this contact permits a greater current to flow through it.
The specific reason the relay activates will vary depending on the layout and function of the electrical system it is a part of.
What causes a relay to trip?
A relay can trip or “open” due to various reasons, such as:
- Overloading: If the electrical circuit connected to the relay draws too much current, the relay may trip to protect the circuit from damage.
- Overheating: If the relay gets too hot due to high current or other factors, it may trip to prevent damage to the relay or other components.
- Faulty wiring: If there is a short circuit or other wiring issue in the electrical system, it can cause the relay to trip.
- Mechanical failure: If the relay’s switch or other components become damaged or worn out, it may trip or fail to operate properly.
- Environmental factors: Extreme temperatures, moisture, or other environmental conditions may cause the relay to trip or malfunction.
In some cases, a tripped relay can be reset by turning off the power and allowing the relay to cool down before turning the power back on. However, if the relay continues to trip or fails to operate properly, it may need to be replaced or repaired by a qualified technician.