If you’ve got some spare time and thought it’ll be best to use it to know how to paint a car, then follow us on our exciting journey. It might be costly to have your car professionally repainted.
If you are painting a car, it can completely enhance its look, giving it a fresh, good-looking appearance when finished correctly. The process may look challenging at first, but breaking it down into straightforward steps makes it simple, even for beginners. With adequate preparation, using the correct tools, a clear plan, and professional-looking results without unnecessary stress.
However, if you perform the work yourself, you can save some money and have some fun! However, in order to paint a car correctly, you need to have decent technique and a lot of practice.
Painting a muscle vehicle or hot rod is one of the most time-consuming and expensive tasks you’ll ever undertake. You can paint it yourself or hire a pro.
Long considered more of an artistic process than a mechanical one, paint, and bodywork. It takes a lot of time to weld, sand, and prepare the body for painting to get a good paint job.
In actuality, painting an automobile is a multi-step process that comes before the actual painting of the car, contrary to the widespread belief that a “paint job” is a one-step procedure.
It takes a lot of patience and a certain amount of perfectionism to be a successful painter because the smallest flaw will show through the freshly painted surface.
Learning how to paint a car in your garage is very different than learning how to paint a wall in your home. While one task only calls for a few paint rollers and a can of paint, the other requires a plethora of clear coats, primers, and sprayers.
Because of this, expert auto paint jobs can be quite expensive. Thus, in this article, we’ll be discussing how to paint a car.
So, let’s dive in!
Learn more about Cost To Paint A Car with this detailed guide.
How to paint a car
Below shows how to paint a car with easy enough steps;
Prepare thoroughly:
You’ll need an enclosed workspace with great ventilation, little dust, decent lighting, and plenty of space to work around the car to paint a car safely and proficiently.
Your home garage might be suitable but avoid painting there if it has a water heater, furnace, or any other source that could ignite the paint fumes that will build up throughout the operation.
Don’t forget to pick up the sprayer, primer, paint, sanding tools, and other materials you’ll need for the project when you visit the home center, paint shop, and/or auto parts store.
First and foremost, ensure sure you have a respirator mask and understand how to use it. When removing or applying the old paint, you should also put on safety goggles, nitrile gloves, and disposable plastic coveralls with hoods.
Use the colour code for your car to, if desired, match the current paint colour. The “compliance plate” under the hood usually has the colour code as well as the VIN number and other important vehicle information.
You can also locate the colour code on the inside of the driver’s side door frame, close to where you can find information about things like the recommended tire pressure for your car.
If you can’t find the specific brand of paint that was previously used, it can be quite difficult to match a paint job’s hue. Your eyes will be able to distinguish the difference even if you cover up a tiny scratch or something comparable in colour.
Learn more about Cost To Wrap A Car with this detailed guide.
Get rid of rust:
People know rust as the oxidation of steel, and uncoated metal typically exposes itself to water or water vapor, which brings it on. When someone adds salt to the process, sheet metal can quickly transform into an unsightly, flaking, rusty mess, as happens on salty roads in the winter or during beach driving in the summer.
The worst thing about rust is how difficult it is to stop the oxidation process once it has begun. The two options are to totally remove the rust or to chemically halt the oxidation process because even removing the moisture source won’t prevent the metal from rusting in a self-destructive manner.
The rust must be entirely eliminated or treated in any case to prevent it from returning under the paint and causing unattractive bubbling.
Complete removal of the rust from the car is the greatest technique to guarantee that it won’t reappear. In some circumstances, you may need to replace the entire panel; however, you can just remove the metal in the rusty region and weld in patches.
Quarter panels, door skins, and floorplans are more difficult to repair and need specialized gear including a welder, clamps, spot weld cutter, grinder, and cut-off wheels. Doors and fenders can be readily replaced by bolting on the new pieces.
Learn more about Car Wash Cost with this detailed guide.
Removing metal due to rust:
The techniques are the same whether corrosion or a collision caused the metal to need to be removed. Create or buy a patch panel, cut it to suit the damaged area, then weld it in place.
The welding procedure itself can be tricky since the heat produced in thin sheet metal panels might distort them, requiring more time to straighten the welded-in panels.
Coating the panel with a heat-absorbing compound and stitch welding (welding small parts slowly) can prevent warping while you weld it in place.
Another issue with welding is the potential for moisture to become trapped in any areas of porosity, which could result in future rust issues.
To ensure the region won’t rust in the future, you can use two strategies: prime the metal with a weld-through primer and sandblast the area after welding.
Learn more about Cost to Put Hydraulics in a Car with this detailed guide.
Chemically treating rust:
The majority of locations with light surface rust can be chemically treated with a liquid rust inhibitor and don’t need to have the metal replaced. OSPHO is a well-known brand, but other producers, including POR-15, also produce liquid rust inhibitors.
Additionally, rust inhibitors can be found in gel form, like naval jelly. Rust inhibitors all essentially function in the same way, regardless of brand.
They contain phosphoric acid as their major component, which changes iron oxide (active rust) into iron phosphate and so chemically halts oxidation.
You can apply rust inhibitor to parts by dipping them in it; however, people more frequently spray liquid inhibitor from a spray bottle on the affected region.
Depending on the amount of rust present, it may take between two and twelve hours for the phosphoric acid to completely transform the rust into black iron phosphate.
Keep in mind that this method only works on surface rust that is not peeling or rusted through. Those regions ought to be removed and rebuilt.
Learn more about Car Detailing Cost with this detailed guide.
Cleaning, masking, and sanding the car:
Remove any easily removable chrome or plastic trim. You can simply “snap” off and put back on many of the body panel moldings found on cars, but if you try to remove one gently and it doesn’t work, don’t try to push it.
Tools that make the process of removing trim easier are frequently sold in auto supply stores. You shouldn’t be too delicate here because you’ll be sanding and repainting the entire car.
Use a metal grinder to grind away all of the rust while wearing safety goggles, overalls, a respirator, and gloves. If you do find any minor holes, fill them with non-rusting car body filler with a putty knife and then sand the material to smooth it out.
When feasible, sand the paint down to the metal. If necessary, you can merely sand down to the primer layer or even only sand the final coatings down to the point where the fresh paint will adhere.
However, if you take the time to sand the entire automobile down to the bare metal, you’ll always get a nicer completed look. Utilize a dual-action (DA) power sander with a 400- or 600-grit pad and move continuously in circles.
When you finish sanding, thoroughly clean every surface of the vehicle. After you remove any apparent surface dust with tack cloths, use rags soaked with paint thinner, mineral spirits, or denatured alcohol to wipe down every surface of the car.
Any leftover dust will be cleaned away during this wipe-down, and any surface oils will be removed. Use painter’s tape, masking paper, or plastic to completely enclose any parts you don’t wish to paint.
For instance, you’ll need to cover things like the door handles and grills and mask off the window glass, window trim, and mirrors.
Learn more about How To Clean Car Seat with this detailed guide.
Prim the vehicle:
According to the package directions, set up your compressed air auto paint sprayer and apply your preferred corrosion-resistant, self-etching automobile primer. Squeeze the trigger while holding the sprayer about 6 inches (15 cm) from your practice area.
Coat the surface in a consistent, side-to-side motion. Always continue to spray in this sweeping motion. A typical car should receive a full priming application in 10 to 20 minutes.
After allowing the primer to dry, add 1-2 more coats as the manufacturer specifies. To allow the primer to cure, according to the directions on the container. An average wait time is between 20 and 60 minutes.
According to the directions on the product, carry out the procedure a further 1-2 times after that. The exposed metal surface should be completely and evenly covered after two to three layers of primer.
After applying the primer, clean the sprayer in accordance with the manufacturer’s recommendations. With wet/dry sandpaper, remove the primer coatings’ powdery finish.
After letting the last coat of primer dry for at least an hour, sand the vehicle’s primed surfaces with 1500-grit wet/dry sandpaper. Work piece by section and lightly sand up and down, then from side to side.
Before painting, you should wipe down all surfaces that you have primed and sanded. Use clean towels that you have mildly soaked with acetone, paint thinner, or wax and grease remover.
Just enough to clear any collected dust or oil should be removed by gently wiping in a circular motion. Allow the car to dry for at least 5 to 10 minutes before moving on.
Learn more about Car Tune-Up Cost with this detailed guide.
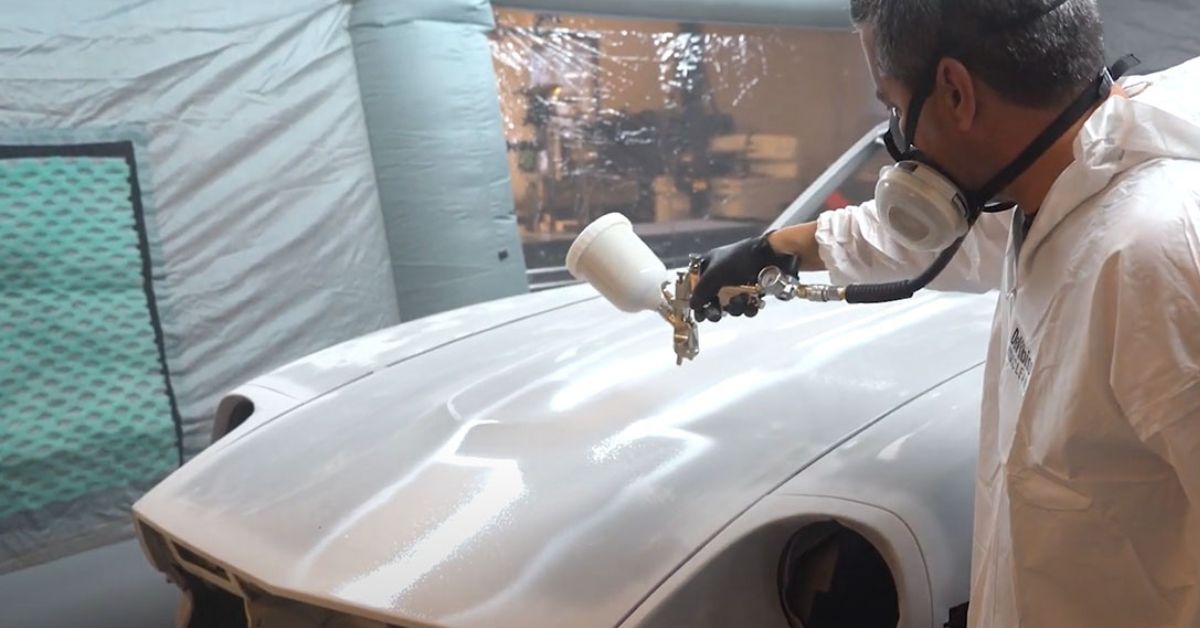
Spraying on the paint coat:
According to the sprayer’s instructions, prepare your preferred automotive paint and load it.
Practice first on a scrap piece of the surface because the paint may spray considerably differently than the primer. Apply a coat to the car next, working your way down from the top using the same side-to-side motion.
Add a total of three to four coats, giving each one adequate time to cure. Per the product’s instructions, allow the first coat to dry for 20 to 60 minutes.
Follow the manufacturer’s directions once again and repeat the procedure two to three more times. After you’ve applied all of your paint layers, clean the sprayer once again.
Similar to how you cleaned the primer coats, lightly sand and wipe down the paint. After letting your last layer of paint dry for at least an hour, use 1500-grit (or 2000-grit, if you prefer) wet/dry sandpaper to gently remove any powdery residue.
Apply the same method you used to sand the primer coat. Use paint thinner, acetone, wax, and grease remover, or a gently moistened towel to wipe off the surfaces. Before moving on to the following procedure, wait 5–10 minutes.
Learn more about Best Garage Floor Paints with this detailed guide.
Finishing touches:
Two layers of clear coat lacquer should be sprayed on, followed by sanding and cleaning. According to the product specifications, fill your sprayer with your preferred automotive clear coat lacquer and apply a coat in the same side-to-side, top-down motion.
Sand and clean the finish as usual after allowing the clear coat to cure as instructed. Afterward, according to the manufacturer’s recommendations, add a further 1-2 coats of clear coat.
Within 24 hours, the paint and clear coat should feel dry to the touch. However, as recommended by the manufacturer, let the finish cure for up to 7 days to get the best results. Store the car where you painted it, and try to avoid getting too much dust on it.
Any small flaws in the finish coat should be sanded away. Start by smoothing out any flaws with wet/dry sandpaper that is 1200 or 1600 grit, using the same tactful approach as before.
Again, as previously, wipe down the sanded areas with damp cloths. Then, to smooth out the finish, use 1600 or 2000-grit sandpaper.
To bring out the sheen, buff the car with a machine or by hand. Although hand labor will yield the best results, buffing tools, and power polishers can speed up the process.
If you don’t have much expertise in buffing, you may want to let a professional handle this stage because it involves precise technique and practice.
Learn more about Best Microfiber Cleaning Cloths for Cars with this detailed guide.
Conclusion
As you can see, painting an automobile requires a variety of specialized instruments in order to be done correctly. It is not as simple as picking up a few cans of spray paint and covering the car in it.
While a small garage or shop can complete the task of painting an automobile, we advise hiring a pro to manage, or at least help with, the procedure.
Always keep in mind that appropriate skills and preparation are essential to a good-looking paint job, so take your time and do it right. Your paint job should safeguard your car and look fantastic for many years if each stage is carried out correctly.
FAQs
What are the steps to painting a car?
- Gather the necessary materials and set up your workplace.
- Fix and remove rust areas.
- Choose the paint kind that you’ll be using.
- Sand your car.
- Clean off your car.
- Prim the car.
- Sand again.
- Use paint.
Can I paint a car myself?
It doesn’t have to be a laborious, difficult procedure to paint an automobile. You can do a professional-level automobile paint job at home by making sure you purchase high-quality materials, utilize the appropriate tools, and have a clean, dust-free workplace.
How do you apply new paint to a car?
- Clean the Car’s Surface.
- Identify the damage.
- Sand the harmed region.
- se paint thinner to clean.
- Put the touch-up paint on.
- Ensure a Smooth Surface.
- Put the Clear Coat on.
- The touch-up paint should cure.
How many coats of paint does it take to paint a car?
Utilize the suggested drying time listed on the paint can and apply three to four coats. Use 2000-grit wet-and-dry sandpaper to remove any powdery residue before applying your final layer of paint, and then wipe everything down with a clean rag.
What is the first coat of car paint?
Usually, an undercoat finish (paint primer) is applied first. Following that, you can select from a base coat, acrylic lacquer, clear coat finish, or one of the various specialty paints.
What are the 4 main layers of automotive paint?
The four layers used in car painting are E-coat, Primer, Basecoat, and Clearcoat
How many coats of primer are on a car?
Apply 2-3 coats, allowing each coat to dry for 5–10 minutes. For best results, wait an hour after the last coat has dried before scuff sanding with #600 grit paper.
What kind of paint do you use on cars?
Modern automotive “enamel” is almost invariably an acrylic polyurethane with a colored basecoat and a clear finish. You may call it “acrylic,” “acrylic enamel,” “urethane,” etc.
Do you need to sand a car before painting?
Before applying primer, you must sand away the existing finish and any rust areas to expose the bare metal in order to ensure that the paint will adhere to the car surface for the optimum finish.
You can sand small parts by hand, but a sander will move more rapidly on bigger panels and curved regions.
https://studentlesson.com/how-to-paint-a-car-using-straight-forward-steps/